It has been pointed out to me that it is hard to get the recipes out of my blog for saving and printing. Since I want to make my recipes useful to you, I have added a link to a PDF of the recipe in each post that contains a recipe. They are now in all the archived posts and I'll add them to any future posts.
Hope that helps! And thanks to Ronnie T. for suggesting this improvement. I'm so glad I was able to figure out how to make my blog more user-friendly.
Monday, November 30, 2009
Turkey and Wild Rice Soup

I think turkey and wild rice go together exceptionally well. They are both native Americans. One can imagine that they have been served together in the Upper Midwest for many centuries.
Wild rice is not a true rice, but it is close relative. It is an aquatic grain native to the Great Lakes and wet forested areas in Alberta, Saskatchewan, and Manitoba. Much of it is no longer "wild" as it is grown commercially in California. When I am very good, my dear friend Kasja brings me wild rice from Minnesota, where it is the state grain.
This is a hearty soup, perfect for a post-Thanksgiving dinner. Just add crusty bread.
Turkey and Wild Rice Soup
(serves 4)
1 tablespoon vegetable oil
1 carrot, peeled and diced
1 small onion, peeled and diced
4 cups turkey stock
1/4 cup wild rice, rinsed
1 16 oz. can white or yellow hominy, drained
1 cup diced cooked turkey (optional)
3-4 tablespoons chopped cilantro
1 tablespoon fresh lime juice
1/2 teaspoon freshly ground black pepper
1/2 to 1 teaspoon kosher salt
1. Heat oil in a 4 quart saucepan over moderate heat. Add carrot and onion. Saute until onion is translucent.
2. Add stock and wild rice. Bring to a simmer, reduce heat and cook partially covered for 1 hour. Wild rice takes quite a while to get tender. If the rice has absorbed a lot of the stock, add 1-2 cups of water.
3. Add hominy and turkey (if using). Cook for about 5 minutes until hominy and turkey are heated through.
4. Add cilantro, lime juice, pepper and salt to taste. If your stock is unsalted, you will need at least 1 tsp. If your turkey was brined, the stock will be seasoned with some salt already and you'll need less.
5. Serve hot.
Link to PDF of the Turkey and Wild Rice Soup
Sunday, November 29, 2009
The turkey carcass
Is that turkey carcass still hanging out in the fridge? What are you waiting for? That's a great pot of soup just waiting to happen. All great soups start with great stock.
Anyone can make great stock. Stock is always made with bones. Since most people pick the carcass clean, that's exactly what you are left with after Thanksgiving. I often throw in the neck too but this year I used them to make a quick stock Thanksgiving day for the gravy.
The method is simple and the same for any white stock where the bones are not roasted. Put the bones in a large soup pot. Cut the main carcass into pieces so it fits nicely. Peel an onion and cut into eighths. Peel a couple of carrots and cut into chunks. Clean two stalks of celery and cut into chunks. They all go in the pot. If you have drippings from the turkey pan, these can go in too. A cleaned leek is also nice if you have one. The typical aromatics are a smashed clove of garlic, 6 whole peppercorns, a bay leaf, a few sprigs of fresh parsley and a sprig of fresh thyme (or 1/4 teaspoon of dried). If you are neat, you can wrap all of these in cheesecloth for a nice bouquet garni. I usually toss all of them in the pot since they will get strained out after cooking.
Cover everything in the pot with cold water. Set on the stove on medium. As the water comes up to a simmer, you want to spoon off the foam that floats to the surface. This will assure a clearer stock. Another tip for getting a clearer stock is don't ever let it get hotter than a simmer. After the water gets to a simmer, turn the heat down to low and let it simmer for at least 2 hours. You can let it go 6 hours if you want.
Take 2 pieces of cheesecloth big enough to cover a large strainer. Wet them, wring them out and place in the strainer. Put the strainer over another large pot or bowl and pour in your finished stock. If you are going to make soup right away, you are ready to go.
If you aren't going to use the stock right away, it's important that you cool it quickly. Put it in the fridge, or your garage if it is cooler than 40 degrees F. I have a couple of small energy drink bottles that I fill with water and freeze. I put them in the stock to cool it down even faster.
You can freeze turkey stock for at least 3 months. It's always nice to have a cache of turkey stock from Thanksgiving hiding in the freezer for a lovely pot of turkey soup in February.
Tuesday, November 24, 2009
Thanksgiving Turkey - Cooking

Since I have two birds every year, one bird goes in the oven and the other goes on the rotisserie on the grill. The rotisserie turkey is always the most beautiful. The skin is crispier and it is an incredible mahogany brown. I throw cuttings from my grapevine onto the grill to add a little sweet smoke.
But, I'm getting ahead of myself. We need to season the birds first. When it's time to roast the turkey, pull it out of the brine and dry it off. My oven-roasted turkey gets the same treatment every year, which is the way my grandmother made it. I rub it with butter or vegetable oil. I sprinkle it inside and out with paprika (helps the color), garlic powder, salt (go light for a brined turkey), and black pepper. Cut a lemon in half and stuff the halves in the cavity. Do the same with a peeled onion. Take some sprigs of herbs (thyme, rosemary, sage) and stuff those in the cavity too. Oh yeah, I don't stuff my birds. Since stuffing has to get to 165 degrees F, it makes it more difficult to cook the turkey properly. In order to get the stuffing hot enough, you need to overcook the bird. Stuffing tastes just fine cooked outside the bird and I don't like my turkey overcooked.
The second turkey gets a southwestern twist. Instead of paprika, I use ground ancho chiles - pure ancho not chile powder. It's a lot like paprika but it has more oomph. Then garlic powder, a little salt, and black pepper. You can use any dry rub you have as long as it is not heavy on the salt. Like the oven turkey, I stuff a halved lemon and onion in there. Sometimes, I put in a halved orange too, if I have one. For herbs, I use thyme only.
I need to truss the turkey for the rotisserie but I don't truss the oven-roasted bird. Take the last wing joints and bend them under the body. Or cut them off and use them for stock.
Preheat the oven to 400 degrees F. Place your turkey on a rack in a large roasting pan. Add 1 cup of water to the pan. Put the turkey in the oven and cook for 45 minutes. Baste and reduce the oven temperature to 325 degrees. Add more water if it has all cooked away. Baste every 30 minutes and check the water. For a 10-12 lb bird, total roasting time is 2 1/2 to 3 1/2 hours. I start checking its internal temperature at 2 hours because I have a convection oven and my turkey is about 10 lbs. The temperature taken in the thickest part of the thigh must reach 170 degrees F. USDA, Butterball and many other sites says 180 degrees but if you cook it that long, you get cotton, not turkey. 170 degrees F is sufficient to kill nasty bugs like salmonella provided you haven't stuffed your bird. Remember to wash your thermometer before sticking it in the turkey again.
Some recipes, like Cooks Illustrated, call for starting the bird on its breast and then flipping it over. I don't bother. It's a real pain in the arse to flip it and I don't know that it makes a big difference, especially in a brined bird. I roast it breast side up the whole time. I usually cover the breast with foil about half way through cooking to keep it from over-browning.
When the bird has reached 170 degrees F, remove it from the oven and cover it with foil. You should wait at least 10 minutes before craving and we often wait longer. Make sure to put your turkey on a heated platter so it doesn't cool off before you have a chance to serve it. Heat your dinner plates too.
I hope your bird is delicious and you have a very happy Thanksgiving!
Sunday, November 22, 2009
Thanksgiving Turkey - Brining
Many of my friends ask me about cooking a turkey this time of year. Some of them have eaten at my house for Thanksgiving and want to recreate my turkey at home. Others just figure I know everything about cooking, therefore I must know how to make a great turkey.
It is true; I make a helluva turkey. There really isn't a secret, other than a whole lot of salt. Brining makes the best darn turkey.
First, we should talk about turkeys. If you get a frozen supermarket turkey, odds are they have done the work for you. These turkeys have been "enhanced" with the addition of salt and possibly flavorings which will result in a very juicy and flavorful turkey. I don't see the point of brining these turkeys (actually I'm not a big fan of these turkeys but they do happen to be very cheap at Thanksgiving). If you buy a fresh turkey, on the other hand, brining will produce the best turkey ever.
Brine is merely water and salt combined in a prescribed proportion. The formula is 1 cup kosher salt to 1 gallon of water. It's easiest if you use 1 quart of warm water to dissolve the salt and then add 3 more quarts of cold water to get to the correct proportion of salt to water. Your brine should be cold before you immerse your turkey. You need enough brine to cover the turkey, so if your container is large you may need more than one batch. If you are using a bucket, one batch should be enough. You can add herb sprigs or halved citrus (squeeze the juice into the brine first) to the brine. The turkey will absorb some of the flavorings as it takes up the salt.
Folks ask how I deal with a big bird and a bucket of salt water. It doesn't fit in the fridge. This is often true because the turkey is enormous. I am not a "big turkey" gal. Since I have a grill with a rotisserie, I make two 10-12 pound turkeys rather than wrestle with a gigantic 20 pounder. But, you may not have that choice because you only have one place to cook said bird. The answer is, I don't put it in the fridge. I suggest a large camping cooler, one big enough to hold the bird(s), the brine and a bunch of ice packs (more on this in a minute). A five gallon bucket is usually big enough to hold a small turkey but since it's not insulated, you need to fit it in your fridge. Fat chance. A cold garage can sub for the fridge, but you may not have a cold garage. Which is why I use a cooler.
Place your turkey(s) in the cooler/bucket. Cover with brine. If it's not going in the fridge, add a bunch of ice in plastic bags to the cooler. This will keep the turkey chilled. You can skip the ice packs if you can put your turkey in the garage and it's going to stay before 40 degrees F. But, do not just throw a bunch of ice in the brine. This will dilute the brine as the ice melts. Weak brine does not produce a tasty turkey.
The nice folks at Butterball suggest brining turkeys under 12 pounds for 6-8 hours. I put my turkeys in the brine the night before Thanksgiving, so I'm in line with their recommendations. If you have a 12-14 pound turkey, Butterball suggests 12 hours in the brine; more than 14 pounds, the turkey can stay in the brine between 12 and 24 hours.
Next, I'll discuss cooking the marvelous bird.
A friendly reminder - if your turkey is frozen, take it out of the freezer right now and put it in the fridge! Never, ever thaw your turkey at room temperature. It's going to take a good 3+ days for even a small bird to thaw in the refrigerator.
Thursday, November 19, 2009
Carrot Cake

Update from January 23, 2011
I finally made this recipe and can give actual altitude adjustments. See my updated recipe below.
I haven't made this recipe in years. I think I was in high school the last time I made it. Just like in those bygone days, it was a huge hit. It's a bit more robust than other carrot cakes, filled with carrot (of course), pineapple, coconut, and walnuts. And no raisins.
But, first, a little story. My mother made this often for her business. The business was a family affair. My aunt was Mom's partner and we all chipped in when there was a big party. My dad helped too sometimes, which usually worked out ok because he does know his way around a kitchen. One day, he was helping to make this cake - a lot of this cake since Mom never made a single recipe. My dad measured out the ingredients and as he was doing that, Mom walked by. She looked at the pile of dry ingredients and said "Something isn't right." My dad had mistakenly pulled out the salt bin for the sugar bin! Mom could tell by looking at the white crystals that it wasn't sugar. She was good.
14-Carat Cake
(from Farm Journal's Best Ever Recipes)
Cake:
2 cups sifted flour
2 teaspoons baking powder
1 1/2 teaspoons baking soda
1 1/2 teaspoons salt
2 teaspoons ground cinnamon
2 cups sugar
1 1/2 cups neutral vegetable oil
4 eggs, lightly beaten
2 cups finely shredded peeled carrots (8 ounces)
1 can (8 or 8 1/2 ounces) crushed pineapple in juice, drained
1/2 cup chopped walnuts (2 oz)
1 1/3 cups flaked sweetened coconut (3 1/2 oz)
Frosting:
1/2 cup butter (1 stick), at room temperature
8 ounces cream cheese, at room temperature
1 teaspoon vanilla extract
16 ounces confectioners sugar
Grease and flour 3 9-inch round cake pans.
Preheat oven to 350 degrees F.
Sift together flour, baking powder, baking soda, salt, and cinnamon in a large bowl. Add sugar, oil, and eggs. Beat at medium speed for 1 minute. Stir in carrots, pineapple, walnuts, and coconut. Divide evenly among prepared pans.
Bake for 40 minutes or until a toothpick inserted in the center comes out clean. Cool in pans on racks for 10 minutes. Remove from pan. Finish cooling on racks.
For the frosting, cream together butter, cream cheese, and vanilla on medium speed. Gradually add confectioners sugar, beating well until smooth and creamy. If the frosting is too thick to spread, beat in a tablespoon or two of milk.
Fill the layers and frost top and sides.
Modifications for 5,000 ft: Reduce baking powder to 1 1/2 teaspoons. Reduce baking soda to 1 teaspoons. Reduce sugar in cake by 2 tablespoons.
Makes 12 servings
Link to PDF of 14 Carat Cake Recipe
Tuesday, November 17, 2009
Cheesecake Cupcakes

This is a recipe with some history. My mom gave it to me; I have no idea where she got it. I carried it with me to Stanford, where I snagged a husband with them. They are that good. And unlike most cheesecakes, they are unbelievably simple to make. Pamela has been making them for years now. Her gymnastics teammates ask for cheesecake cupcakes on their birthdays. Mom, me, Pamela - three generations of cheesecake cupcake makers winning hearts. Maybe you can win over some hearts with them too.
Cheesecake Cupcakes
Filling:
24 ounces cream cheese, at room temperature
5 large eggs, at room temperature
1 cup sugar
1 teaspoon vanilla extract
Topping:
1/3 cup sour cream
2 teaspoons sugar
1/4 teaspoon vanilla extract
Preheat oven to 300 degrees F.
Line 18 regular sized muffin cups with cupcake liners.
For the filling, beat cream cheese until smooth. Beat in eggs, one at a time. Make sure egg is fully incorporated before adding another. Beat in sugar and vanilla. Divide among muffin cups (about 1/4 cup per cupcake).
Bake for 45 minutes or until just set. Do not overbake! They should not brown at all.
Cool for 5 minutes in the pan.
Combine topping ingredients in a small bowl. Fill the depression in each cupcake (it will form while cooling) with 1 teaspoon sour cream mixture.
Bake for an additional 10 minutes.
Cool completely.
Store in refrigerator. Serve chilled.
Make 18 cupcakes
Link to PDF of Cheesecake Cupcakes Recipe
Sunday, November 15, 2009
Lemon Love Notes

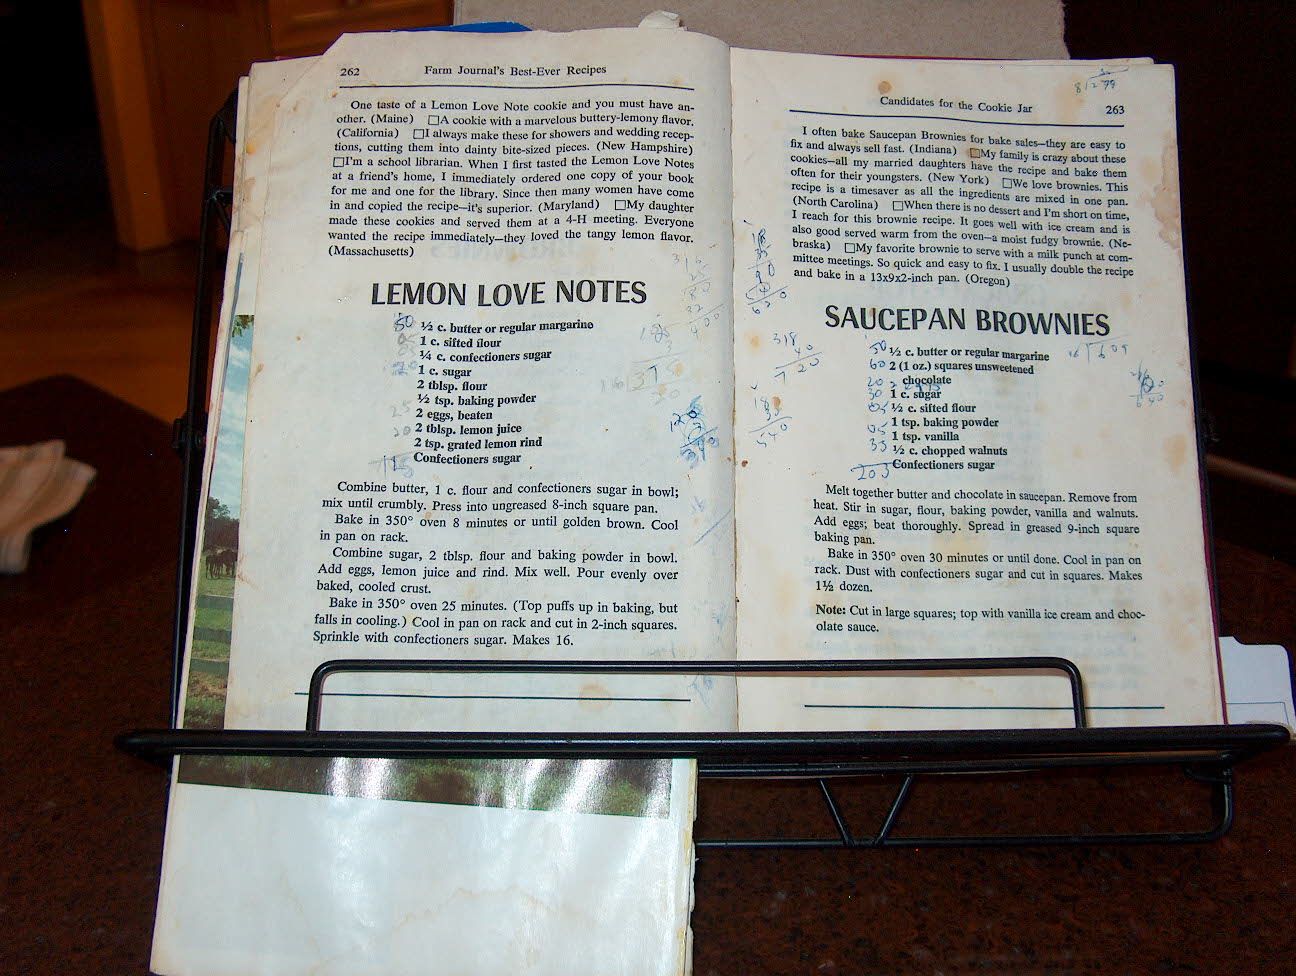
This recipe was one of my favorite cookies from my mom's catering business. I have made many lemon bar recipes, but they don't compare. The recipe was lost for quite a while, on two separate occasions. After my mom passed away, my sister and I divided up her cookbooks. I got most of them but not the book with this recipe. I didn't even know what book contained it. I was visiting my sister in Connecticut and found the boxes of cookbooks in her basement. I wasn't actually looking for this recipe, just looking through the books she had. And there it was! My sister generously gave me the book, Farm Journal's Best Ever Recipes since the book has long been out of print. As you can see from the photo, the book has seen better days.
Now I knew what book had the recipe, but that didn't mean I could keep track of the book. When you have over 800 cookbooks, sometimes they get misplaced. This week, I was going through the few boxes left from our kitchen remodel last year and in a book full of novels, I found it again. I hope you all enjoy it. Pamela certainly did; I almost didn't get that photo before she ate half of them.
Crust:
1/2 cup butter (1 stick)
1 cup sifted flour
1/4 cup confectioners sugar
Filling:
1 cup sugar
2 tablespoons flour
1/2 teaspoon baking powder
2 eggs, beaten
2 tablespoons fresh lemon juice
2 teaspoons lemon zest
Garnish:
confectioners sugar
Preheat oven to 350 degrees F.
Combine crust ingredients in a medium bowl. Mix until crumbly. Press into an ungreased 8-inch square pan. A little confectioners on the fingers is useful to prevent the crust from sticking as you do this. Bake for 8 minutes. Cool in pan on a rack.
Combine sugar, 2 tablespoons and baking powder in a medium bowl. Add eggs, lemon juice and lemon zest. Mix well. Pour evenly over baked, cooled crust.
Bake for 25 minutes. The top will puff up during baking but falls in cooling. Cool in pan on rack and cut into 2-inch squares. Sprinkle with confectioners sugar.
Note: for altitude, use a pinch less baking powder.
Welcome to World on a Platter
Welcome! This blog is dedicated to the memory of my mom who started a catering business in the late 70's. It was called "World on a Platter" hence the name of this blog. At the time, I wasn't a foodie. In fact, I was a pretty picky eater. It wasn't until I left my mother's amazing cooking that I started exploring the wonderful world of food. Now, most people would call me an adventurous eater, and a very serious cook.
I love to cook and I love to try new recipes. I love to tweek recipes. This is a place for the recipes I've found that are worthy and to give advice on making recipes better. Just because it's published somewhere, doesn't mean it works!
I will also use this space to comment on food, from products I like (or don't like) to the broader issues in food such as eating local and slow food.
But, mostly this is about recipes that I love. I hope you enjoy them too!
Subscribe to:
Posts (Atom)